Beauty - Food - Life

Wednesday 2 August 2017

Syn free Carrot cake oat pancake recipe

Welcome back to An appetite for makeup, 


So to kick off the introduction of more slimming world posts on my previously makeup centered blog, I thought I would share with you all my favourite breakfast recipe. 

Before slimming world, I used to skip breakfast, I would have something sugary at about 10.30, usually half a pack of biscuits; however now that's completely changed; I make sure I have a big breakfast every single morning to try and curb any mid morning picking.

So anyway back to the pancakes; I make lots of variations on these oat pancakes but this is my favourite recipe, and because I have added carrot, I am adding more speed (which is the secret to slimming world)


Ingredients - 
40g of oats
1 egg
50mls of milk (from your hexa allowance)
Yogurt of your choice 
A dash of vanilla 
1/4 of tsp of cinnamon
Half a grated carrot (which I microwaved for 1minute)
Half a tbsp of sweetener 
Raspberries for topping
Fry light 

Method - 
Measure out 50mls of milk (from your allowance) in a jug, add the oats, vanilla, cinnamon, sweetener, egg, grated carrot and 2 tbsp of yogurt and stir really well.


Add a couple of sprays of fry light to your frying pan and turn on to a medium heat.

Add your mixture to the pan, I got three out of this mixture. The mixture is quite wet but it will set up.


Fry them for about 3 minutes each side, keeping an eye on them, as they can quickly burn.

I served them with the rest of the yogurt and defrosted frozen raspberries. 
However you could serve them with any fruit of your choice or even syn some ice cream and have them for desert.


 So here is the finished product, they were delicious!! 
I hope you enjoy if you decide to try them!! 

Please comment down below to tell what you think.

For more SlimmingWorld inspiration add me on instragram at @nicolacrossmansw ( I post a picture of every single thing I eat)

Thankyou for reading 

Love Nicola x x x 

Re-introduction - Slimming world update

Welcome back to An appetite for makeup- 


So let me re-introduce myself, I really wanted to do this post as I feel I have lost my mojo for blogging.
There was a time, about two years ago, I was really into blogging, very passionate about what I was blogging about and I feel as if I've lost that. 
I have not lost the passion for beauty or makeup; I just feel I have lots other things I'm also passionate about and want to share. 

So this post is basically re-introducing my blog and telling you what to expect.
If you have read some of my most recent posts. you will see I'm on a slimming world weighloss journey and it's been pretty successful. I've now lost 4 stone 12 pounds, and pretty much completely changed my body. 
This is a huge passion of mine and something I want to share with you all.
However, I felt, when putting those kinds of posts up on my blog, the post felt very disconnected with the theme. 

I wanted to write this post, to tell you all, that what you will see from me from now on, is going to be a lot more varied.
I did think about changing the name of my blog, however becuase the name of my blog is An 'Appetite' for makeup, and the word 'Appetite' is usually connected with food, so I felt it all still fit in.

So what will you see from me.........

Lots of varied posts about - 
Makeup
Beauty
Nail art
Slimming world 
Lifestyle 
Baking
And more

I hope you continue to support me and my blogging journey and I feel that this re-introduction will allow me to get my mojo for blogging back, as it will enable me to write about many of my passions. 

Love you lots 

Love Nicola xxxxx

Wednesday 5 July 2017

Rose Gold Makeup Look

Welcome back to An appetite for makeup, 


I thought whilst I was on a bit of blog post run, I would do post on this rose gold look, hope you enjoy it. 

I bought the Huda Beauty Textured shadows pallette, Rose gold edition, a little while ago and I have been meaning to put up a post about it, so I'm finally getting round to it.

Just to start this post off, I've been seeing the 'miracle' foundation, that covers all imperfections and even tattoos, so I bought it, it was £9.99 and I bought it in the lightest colour, so big mistake. 
It was the Dermacol Film Studio Makeup Coverup.


So as you can see, completely the wrong colour; but I thought it might be a good concealing product for under my eyes. So let's get on with the makeup.

I firstly, moisturised with my Dermalogica intensive moisture balance.


This is my natural face, so you can the transformation to its fullest, 'makeup is a wonderful thing'.


I applied MAC - prep and prime skin base visage all over my face and then using a damp beauty blender I applied Too faced - Born this way foundation. I used the Dermacol makeup cover to conceal under my eyes and as a highlight (it's way to thick in texture for my liking)
I set it with Benefits - the POREfessional agent zero shine in my t-zone; and then set  the rest of my face with Estée Lauder double wear powder.


I then moved on to my eyes, first going in with Benefits stay don't stray eyeshadow primer to Makeup the eyeshadow stays on all day and has something to adhere to.


So now on the eyeshadow; first I swept 'BAE' over the lid.


Then using a big fluffy brush, I mixed 'HENNA' and 'SANDALWOOD' concentrated it in the outer 'V' but also in the crease. Making sure to blend it really well to achieve that blown out look.


Next I deepened the crease with 'COCO', again blending to really blow out the look.


I then went in with a flat brush and covered the lid in 'BLESSED'.


I then added 'TRUST FUND' to the inner third of my lid, I then added 'COCO' to my lower lash line and also blew this out.
Also using MAC brow pomade in Dirty blonde and darkened and shaped my brow.


Using Kat Von D tatto liner and Too Faced Sketch maker; I created a wing.
Using Charlotte Tilbury Mascara I gave my lashes top and bottom a good coating; and lined the outer half of my waterline with Charlotte Tilbury kohl liner.


To Finish off the face, I used the bronzer in the Too Faced The Power Of Makeup by nikkietutorials pallets to create a contour and add colour to my face, I also added the pink blush and highlight from the same pallette.


On my lips, I added my Gerard Cosmetics hydra Matt liquid lipstick in the shade 'CHER'


So this is the finished look, perfect for any special occasion or night out.


I hope you like it and Thankyou so much for reading.

Please let me know you think.

Love Nicola

Xxxxx

Tuesday 4 July 2017

Honey and soy chicken salad in a jar

Welcome back to An appetite for makeup,

Last year I posted a whole week of meals on Slimming world, at that time I had lost 3 stone 2 pound. 
Now I have actually lost 4 stone 11 and a half pounds, slowly but surely getting to where I want to be. 

For today's post, I thought I would show you one of my favourite lunches which is really easy to take to work and can be even made three days in advance.
It's a salad in a jar, and this recipe is a Honey and soy chicken salad in a jar. 


Ingredients - 


1 - Small chicken breast
2 - Slice of bacon, all fat removed
Tomatoes
Mushrooms
Cucumber 
Salad leaves
Soy sauce
Sweetener
Butter fry light
Salad dressing, I used light honey and mustard dressing which is (0.5) syns for a tbsp
A jar - I used the one in the picture however you can up-cycle and old jar for a curry sauce ect.

You can use any salad, but which is what I had in the fridge at the time. 

Method - 


- Firstly, I cut all the fat off the bacon and using scissors chopped it in to a pan, sprayed with butter fry light.
- Next, I chopped a small chicken breast in to small pieces, and added it to the pan.
- I then fried the chicken and bacon off for about 5 minutes.
- I then added a splash of soy sauce and tsp of sweetener.
- I fried that for a few more minutes and then turned off the heat and let it cool completely.
- Once cooled, I added that to the bottom of the jar.
- I chopped the mushroom, tomato and cucumber and added it layers in the jar.


- I then added a tbsp of the light honey and mustard dressing and a dash of soy on top of the cucumbers.


- Finally, I added lots of salad leaves and closed the lid, and place it in the fridge for up to three days.


This salad is perfect for EESP days and it is really filling, I think some chopped spring onions would go really nice with these flavour combinations, however I didn't have any. 

Thankyou for reading, 
Please let me know if you try it and what you think of it.

Love Nicola xxxxxx

Monday 3 July 2017

Updated skincare routine!

Hello and welcome back to An Appetite For Makeup,

Updated Skincare Routine - 


I am someone who has battled with my skin all my life, when I was younger I suffered with large pour, oily skin and blackheads, I used every mattifying product on the market and bought extremely abrasive exfoilators to try and scrub away my blackheads.
None of this ever worked, however as I got older my skins settled down and it seems to have completely changed over the last few years, my skin now is extremely dry and only get the odd spot. 
However this is not in anyway better, my skin is so dry and my makeup doesn't sit well on top of it, it had become very red and itchy and it actually was beginning to get me down. 
I choose to go and see a dermatologist, to see if they could help. I am from the North East of England, so I had a google and found a place in Sunderland called 
Park Grange Advanced Skin Clinic
I called and made an appointment for a consultation, which actually was free, she gave me so much advice and a mini facial. I came away with lots of testers and booked myself in for a 30minute facial. 
It was just heaven, I can't recommend it enough. 
The facial was around £45, and then I bought three products, which were quite exspensive however they come in very big bottles for skincare. The clinic stocks their own brand of the skincare called Dermalogica. 
I'm just going to finish off my post by showing you the products I bought and giving some brief opinions of them for my skin type. 


Ultracalming cleaner - 

This product is a cleanser, the bottle is huge and you only need a pea sized amount, it helps to reduce redness. My skin reacts to it very well and doesn't sting as all. 


Daily microfoliant - 

As previously mentioned, I used to buy extremely abrasive exfoliating products, however this is the exact opposite. 
This is a exfoliating powder which is very finely milled, you mix it with a tiny amount of water to create a paste and gentle massage it in to your skin, it feels so refreshing and gentle buffs away my dry skins


Intensive moisture balance - 

With dry skin, a good moisturiser is a must, I was using a Clinique one, which I have previously raved about but after talking to my dermatologist, this may have been causing some problems. 
This moisturiser is amazing, I can really feel is getting in to my skin. 

Like I said, the products are like exspensive, however the bottles are huge so I feel they will last quite a long time. 
Next time I go, I am going to purchase a mask, something I can put on for a extra hit of moisture. 

Thankyou so much for reading, if you have ever tried Dermalogica, please let me know your thoughts and please let me know your skincare favourites. 

Love Nicola x x x 

* This post is not sponsored, all my opinions are my own as always. 


Tuesday 28 March 2017

Nude geometric fashion inspired nail look!!

Hello and welcome back to An appetite for makeup, 

I've had a little time away from my blog but I am back and I have lots of exciting products, nail tutorials and lots more to share with you. 

So for my first blog post in a while, I thought I would start with a nail tutorial. 

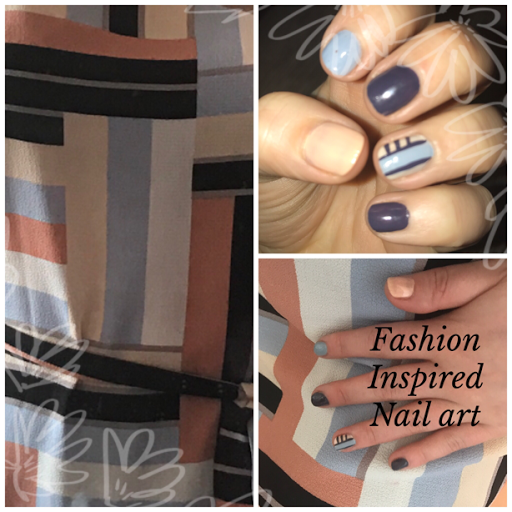
I recently bought a dress from primark, I loved the print on it and I thought to myself 'that would look good on my nails', I hunted out the colours and made a start. 


So what you will need....


A cream nail polish - I used EVERGLAZE extended wear from China glaze, in the colour Cash-merely.*

A dark grey polish - I used Rimmel London, super gel in the colour Punk Rock.

A pink/nude polish - I used a OPI nail lacquer, that didn't have a name however the number was NLM82.

A pale blue polish - I used a Ciate mini polish in the colour Chinchilla.

A top coat - preferably a gel effect polish.

A nail striping brush - I used a black striper and cleaned the polish off with nail varnish remover.

Firstly, I decided produce a geometric design on my ring finger, so I painted this finger with the cream polish.


Next I painted my little finger and my middle finger with the dark grey polish.


I then painted my index finger with the pale blue polish. 


Finally I painted my thumb with the nude polish.


So now I have all my nails painted, I am going to concentrate on my ring finger. 
Using the pale blue polish and the brush on its side, I made a thick blue stripe down the nail, slightly off centre.


Using the pink/ nude polish, I made a square of colour next to the blue stripe.


Using the black striper and the dark grey polish and made two stripes to outline the pale blue polish.


I then made three horizontal lines to outline the pink/nude polish.


I let everything dry for about 10 minutes and then applied a thick layer of gel effect top coat.


I thought I would give you a close up of my dress and my nails.


I really liked how this nail design turned out.
Hope you like it! 

Please comment down below if you try out this nail art look.

* any product marked with a *, has been gifted to me, 
However as always all thoughts and opinions are my own.

Thankyou so much for reading.

Nicola xxx